Showing posts with label Steampunk. Show all posts

Sunday, 15 May 2016

Steampunk Pocket Watch


I saw SanDee and Amelie's challenge blog the other day and it reminded me I had not done anything steampunky for ages and I fancied a bit of a change of so I dragged out my resin and some cast pocket watch's I had brought a couple of months ago and put away as they were bright silver and a bit nasty looking.


But with some DecoArt gold media paint and a couple of colours of Antiquing cream they now look old and so much better, amazing the difference a bit of paint can make to just about anything really !!.


I layered up some watch parts and a new little heart that I filled the recess on with red resin before I used it. 

Details of the challenge can be seen here.

Have a great day, Carol xx

Wednesday, 27 May 2015

Tin Frida Necklace for SDC197 Tin is in


It's Wednesday and that means a new  Stampotique challenge , and  Janet is the hostess this week, and she her theme is "Tin is in"

Janet says about her challenge 

"I am challenging you to use some form of tin in your artwork. Consider incorporating craft tin, tin tape, an Altoid container, a repurposed tin can or any tin object to incorporate with your stamping.Put on your "tinking" caps and join us in this challenge to have a chance to win some Stampotique stamps."

I have used some bits of old biscuit tins to make a necklace using the mini Frida stamp as the main focal point.

I used the following stamps


The full details of the Challenge can be seen HERE. Including details of how to link your items for the challenge and be in with a change to win a $30 voucher to spend on Stampotique Rubber stamps.

Stampotique Rubber Stamps are available to buy directly from Stampotique originals and other on-line shops.

Carol x

Monday, 25 November 2013

Little Yummy Bits on Folksy


I was due to do my annual christmas craft fair on Saturday, but I got a phone call the week before to say my table had been double booked and as the other booker was a charity I felt I had to step down and let them have the table.


So I am just updating my Folksy shop with lots of bits and pieces. It would be great if anyone who is interested would pop over and have a look.

Thanks, Carol x

Thursday, 5 September 2013

Melt Pot Magic for That's Crafty


This week I have been playing with my melt pot and UTEE to make some pendants using Memory Frames. I have made the three that are shown in the photo. Full details can be found on the That's Crafty Blog.

Carol Xx

Monday, 2 September 2013

Chunky Steampunk ATC for Unruly Paperarts


For the current challenge on Unruly PaperArts.
What I love about chunky wooden ATC's is the fact that you just just shove loads of stuff on them.
For this one I simply painted it cream and then dragged some brown paint over it to distress it a little bit, I stamped my back gound directly onto the block using black archival ink.

I drilled a hole in the side to insert a key charm and then added various painted die cut chipboard cogs and wooden spools to look like they were interconnecting and would actually turn and wind the chain.

My main image was stamped onto card and coloured in using Inktense pencils and mounted into position with sticky pads.


I was trying to get the feel of my Icarus trying to reach the handle to turn off the crazy machine before it turns night into day and burns his wings

My main image is the the Icarus stamp by Lost Coast (he is one of my favourite stamps)
The background is a Blockheads Stamp.

Thank you for your visit today, Carol x

Wednesday, 21 August 2013

Tando - Free for all Week


This week on the Tando blog it is a free for all week, so the choice of theme is up to you. As the guest this month I have altered the Mad Hatter's Top Hat Kit.


As you can see from the photo's I had a lot of fun with this item. Full details can be found on the Tando Blog.

I used.


Carol x

Tuesday, 13 August 2013

Andy Skinner Week on the Tando Blog


It’s the week to share our  Andy Skinner  makes on the Tando Blog so as the guest this month I have this to share with you. 
I decided to go with a gothic steampunk look for my finished item, imagining a witch tenderly stroking her spell book thinking of the evil within, as I used  a Neil Walker book cover kit and lots of grunge paste to bring my idea to life.
Full details of my make can be seen on the Tando Blog.

I used


Carol Xx

Thursday, 18 July 2013

Steampunk Sparrow's artful flight


For That's Crafty this week, a metal tag featuring the Steampunk Sparrow by Deep Red stamps, shrinky dinked up and layered onto the tag with lots of bits and pieces. For full details have a look on the That's Crafty Blog.

Thank you for your visit today, Carol x

Thursday, 4 July 2013

Steampunk Box For That's Crafty


I have this steampunk box on the That's Crafty blog today, for a better look and all the details please pop over to the blog using this LINK.

Thank you for your visit today, Carol x

Saturday, 16 March 2013

Steampunk Dragonfly Necklace


This week For Happy Daze I have used a selection of the jewellery parts and resin available to make a Dragonfly Necklace. For details of all the items used please visit the Blog.

I have listed this particular necklace for sale on my Folksy shop.

Thank you for visiting today, Carol x

Friday, 14 December 2012

Resin Steampunk keyring For Happy Daze


This week For Happy Daze I have a keyring to share with you.

I found a pack of these metal dog tags amongst my stash recently, right at the bottom of a draw so I think I must have had them for ages.
Stamped directly onto the metal tag using Black Stazon. The cogs stamp is from the Artistic Outpost Stamp set Industrial Backgrounds.
I added a cog and a games spinner with a brad in the centre. I sealed both sides of it with Lisa Pavelka resin.


Thank you for visiting, Carol x

Monday, 17 September 2012

Steampunk Birdhouse


This was one of those projects that just happened as it went along, It started with no plan at all really. It began with an Ohh when I got the bird house out of its delivery box, I stuck on the cogs and then it sat there.....then my Verday arrived, so to me the logical step seemed to be to paint it. So it all went Copper....and then it sat there again, whilst I got on with other things and thought about it. I decided on a rusty roof, so I gave it a coat of the  Iron over the copper base and spritzed it. 


You can see the result in this photo

It was at this point I realised I should be taking photo's.


Basic items I started with: the Bird House, Die cut chipboard cogs and Ten Seconds Studio Metal. Other things will be added later but I don't know what yet.

I want some kind of stand for it so I am sitting here staring round my room hoping that something will appear, I think I need to go and investigate the garage and shed......be back soon. 


Well look what I found, I had forgotten all about this propeller. I picked up 2 of them at a reclamation yard I go to ( I actually go there so often that the lovely man who owns it now keeps me odd bits and pieces, and he had saved me these) I had put them in a box in the shed with lots of other bits, it was like Christmas. The bun knobs will be the feet, but the propeller will be used on it somewhere.

I have now decided to patina the sides so they go bluey / green, so I have applied the brass and copper paint over the copper base coat, and then spritzed it. It's now sitting and drying and waiting for the patina to appear. I use an old tray covered with paper when I spray with the patina as its then easy to move out of the way. I also added some of this patina colour to the roof, to pull the roof and the sides together a bit.


Painted and spritzed, waiting to dry, you can already see the colours starting to appear.


The next morning, you can see how the colours have appeared.

I painted the little bun feet in the same way as the house, but as the propeller was already metal and  rusty I decided I did not want to totally cover this up, just blend it into the colour scheme of the house a bit. So I gave it a quick swish around with the copper paint and then while this first coat was wet I spritzed it and I got the effect I wanted, it pooled in areas on the propeller and left some areas untouched. I wanted it to look like it had been left in the garden and just aged and I think I got this quite well, so I was very happy.


The propeller and feet once the verday is dry.

I stamped the clock image directly onto the Copper metal sheeting (I used Stazon) and then cut this out using a pair of scissor snips I have, I have found using my normal craft scissors on metal to much, can blunt them. Using a strong glue, I stuck this over the circular hole in the front of the house. I then layered up a few of the chipboard cogs, gave them the verday treatment. I added these to the clock front adding clock hands and an old rusty upholstery to the enter. I now glued on the feet and added the propeller.


I now now die cut some flowers and a butterfly Ten Seconds Studio Metal. 


I embossed the metal, using an embossing folder and my big shot.


I applied the patina solution directly to the metal using a sponge and left the patina colour to develop. When it is dry lightly sand the die cut shaped to remove the patina finish from the raised areas. 


Look how gorgeous this butterfly looks.

I now layered the die cuts up to make flowers, adding a bead to the centre with a piece of wire, and bending the petals to shape. I left the wire long enough to attach the flowers to the bird house with, and have enough spare to leave a small coiled length. I wound a piece of rusty wire around the bird house and attached the flowers and butterfly to this.


The Flowers finished and attached.

Thank you for taking the time to read this very long blog post and I do appreciate any comments that are left. Ten Seconds Studios metal and Verday Products are available from Ten seconds Studio.  They are on Facebook, and you can find their Blog HERE. In the UK you can purchase Ten Seconds Studio products from Happy Daze.

I also used the following products on my house.

Steampunk Birdhouse From Happy Daze
Tim Holtz Tattered Flower Garland die
Butterfly Die from Crafty Individuals


Carol x

Monday, 10 September 2012

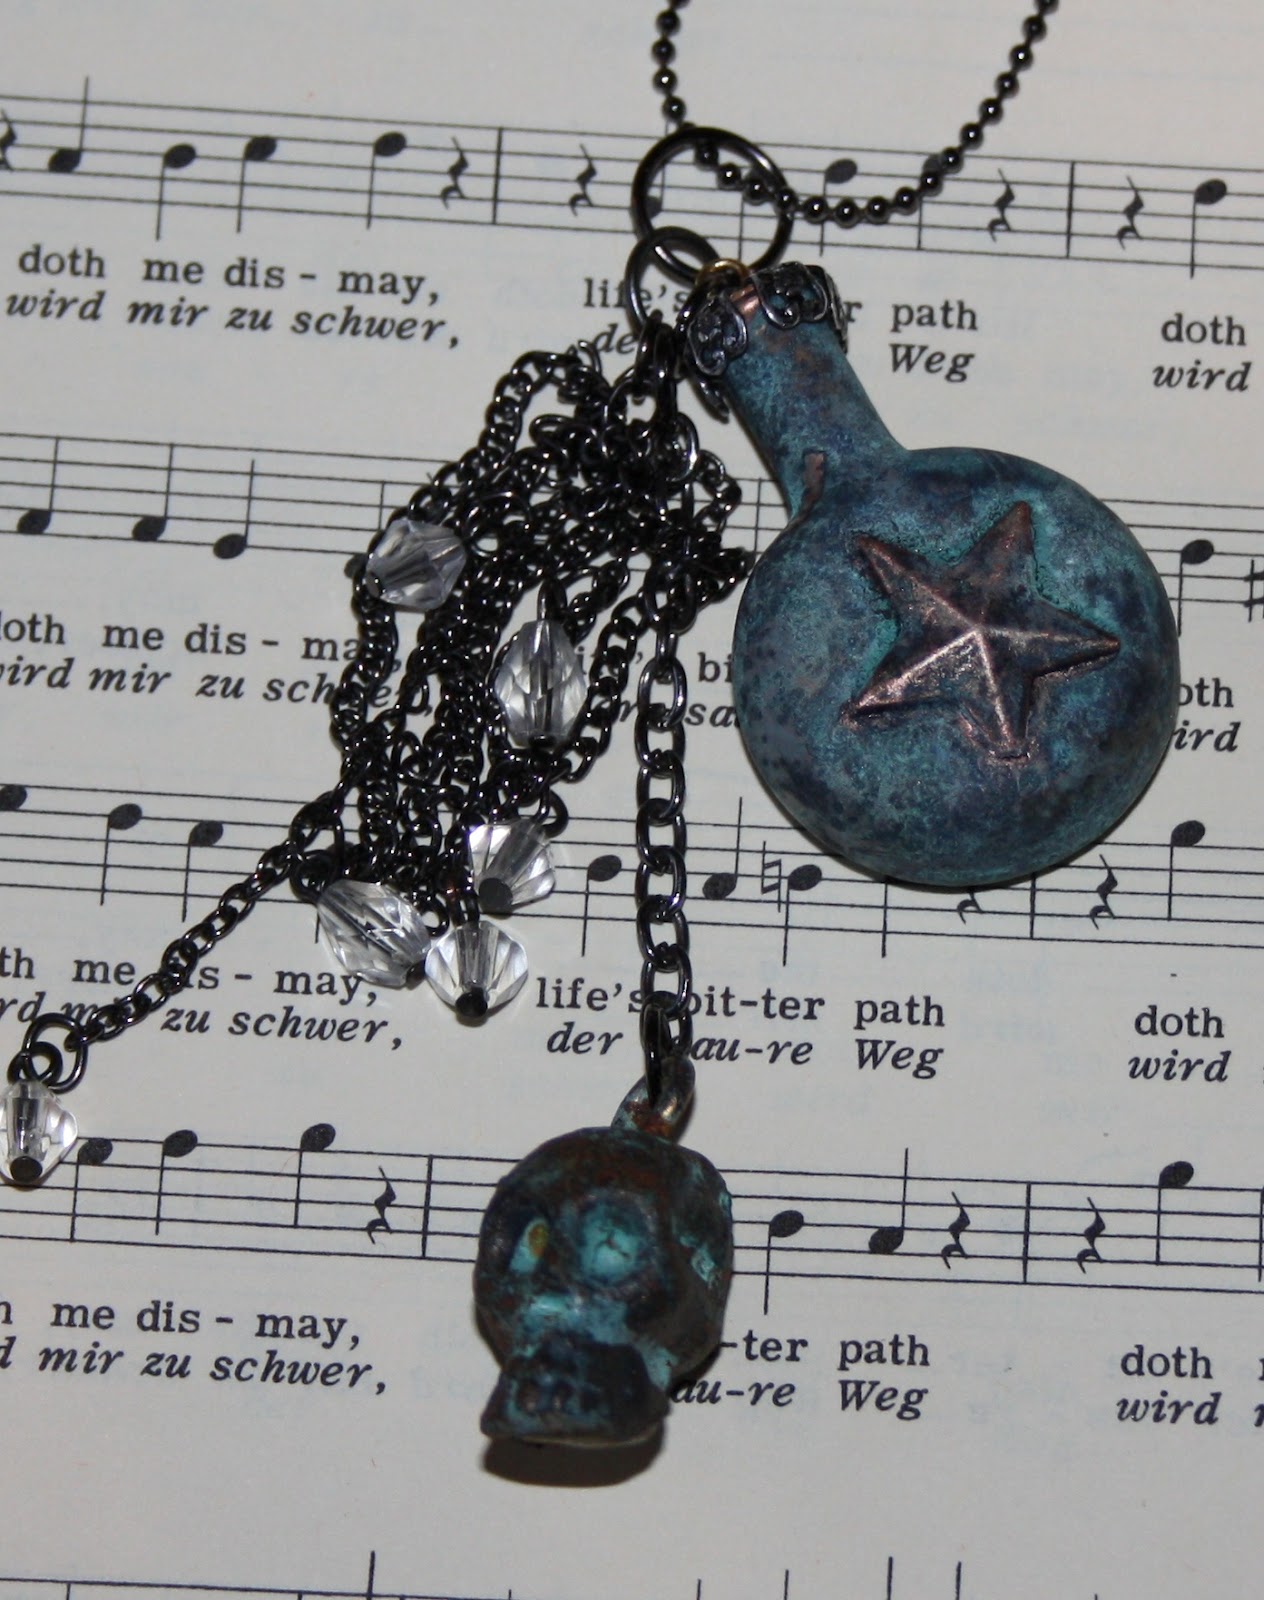
Altered Art Jewellery with Ten Seconds Studio Verday Paint


For my 2nd piece this month with Ten Seconds Studio Verday Paint I have made some jewellery. You can find Ten Seconds Studio on their website, their blog and their Facebook Page.


What I used

The only difference between the photo and my items used is the shape of the bottle, as I forgot to take this photo before I started and then I broke the other bottle of the same shape I had so I used a different one for the photo, but the bottle is just a basic little bottle like the Tim Holtz ones you can get or other makes that you can buy, just get one the shape you fancy and it will work just as well.


I am very happy with how the bottle turned out as I was not sure how the Verday would work on glass. I found in the end the best way was to coat the bottle with a base coat, I used the Viva Decor base coat in the end. I did experiment with PVA and multi medium but none worked as well.


Remove the cork and find something to fit into the hole so you have something to hold it with. ( I used a pippet as it's quite easy to shove in as far as you want to get a good fit.)  give the bottle a coat of the base and let it dry, it only takes a little while. Cut the hanger off the metal star and glue to the bottle. Now apply the Copper Verday paint to the bottle, I  found that 2 thin coats of the paint worked best, letting it dry between coats. (stick the end of the pippet into a jar and it sits up and drys) Once the 2nd coat is dry, allow at least a couple of hours for it to really set. Now use a sponge apply your choice of colours, I used the Brass. Now while it is still wet spray it with the Patina solution and leave to dry and for the patina to develop.


While this is working go to work on your skull. screw a small eyelet into the top of it and use this to hold it by. I used the Iron as a base on this as I wanted it to look old and as if it had just been dug up from a graveyard. As this was plastic it need the paint to be dabbed on and not brushed, and again this worked well in 2 thinner coats as you could give it 1 coat and then fill in any gaps with the 2nd. Let this dry well like you did for the bottle,. The using the sponge again and the Iron paint dab it onto the surface. Quickly before it starts to dry, add the bronze paint in some places, but not over the whole skull. Spray with the patina and leave for it to develop.


I wanted a very metallic look to the bottle and skull so when they were dry  I gently polished them with a soft cloth.

I added a jewellery finding to the cork to look like a metal bottle lid and then replaced the cork into the bottle add a bit of glue to hold it firmly. I then added jump rings and odd bits of chain to make a finished piece of jewellery.


Carol x 

Monday, 2 July 2012

Professor Bumbles Magical Travelling Steampunk Suitcase for The Artistic Stamper


I am lucky enough to be the guest Designer at The Artistic Stamper this Month, and this the first of 3 projects I shall be sharing on their blog in July.

This is a little sneeky peek and you can see all the details about Professor Bumbles Travelling Suitcase on their Blog.

Carol x

Tuesday, 26 June 2012

Aviator Optical lens Pendant


I have made this using images from the Artistic Outopst sheets Charles and Amelia and Industrial Backgrounds both of which can be found here. The dog tags are die cuts that I have stamped onto and puch holes in, once shrunk I have sealed them with Glossy Accents. I have used a vintage lens for my pendant, but these in the shop will work great on this project.
The optical lens has been sealed with Ice Resin to protect the rubber stamping


Carol x

Tuesday, 24 April 2012

Steampunk Stargazer Chunky ATC

I am developing a serious condition concerning these chunky ATC's and of course there is no hope for me now that Moira stocks them in the shop. This is the link for them.
I love the fact that you just just shove loads of stuff on them.
For this one I have used the Icarus stamp by Lost Coast (he is one of my favourite stamps of the moment). The background is one of the new Blockheads range (Stargazer) that are now being stocked.
All my cogs are die cuts mounted onto wooden spools. I was trying to get the feel of my Icarus trying to reach the handle to turn off the crazy machine before it turns night into day and burns his wings.

Carol x

Monday, 9 April 2012

Steampunk Arch For Happy Daze


I have used one of the wooden arches and some of the new Blockheads rubber stamps available from the shop for my piece this week. For all the details and materials used have a look on the Blog.
There is also a new challenge this month of April showers. There is a link on my side bar or check out the post on the Shops Blog. There is a £15.00 gift voucher that has to be won by some lucky person.

Wednesday, 7 March 2012

Fly


I wanted to play with some new Oil Pastels I got recently. I got them to colour in images with as I fancied a change from the pencils I usually use. I have seen Helen using these to great effect, and I just had to try them. I got mine from Paper Artsy. I only used them on the images, but I am really pleased with them. The background is done with my ever faithful Distress inks.
The images and background were built up with masking.
The Icarus image is by lost coast I just love him. I have used him so much since I got him, but I only today realised I have never blogged him before. His available from Happy Daze.
I did this with the Gothic Arches Challenge of Fly the Nest in mind, Icarus is trying desperately to escape his small town with his hand made flying contraption, I just hope he makes it.

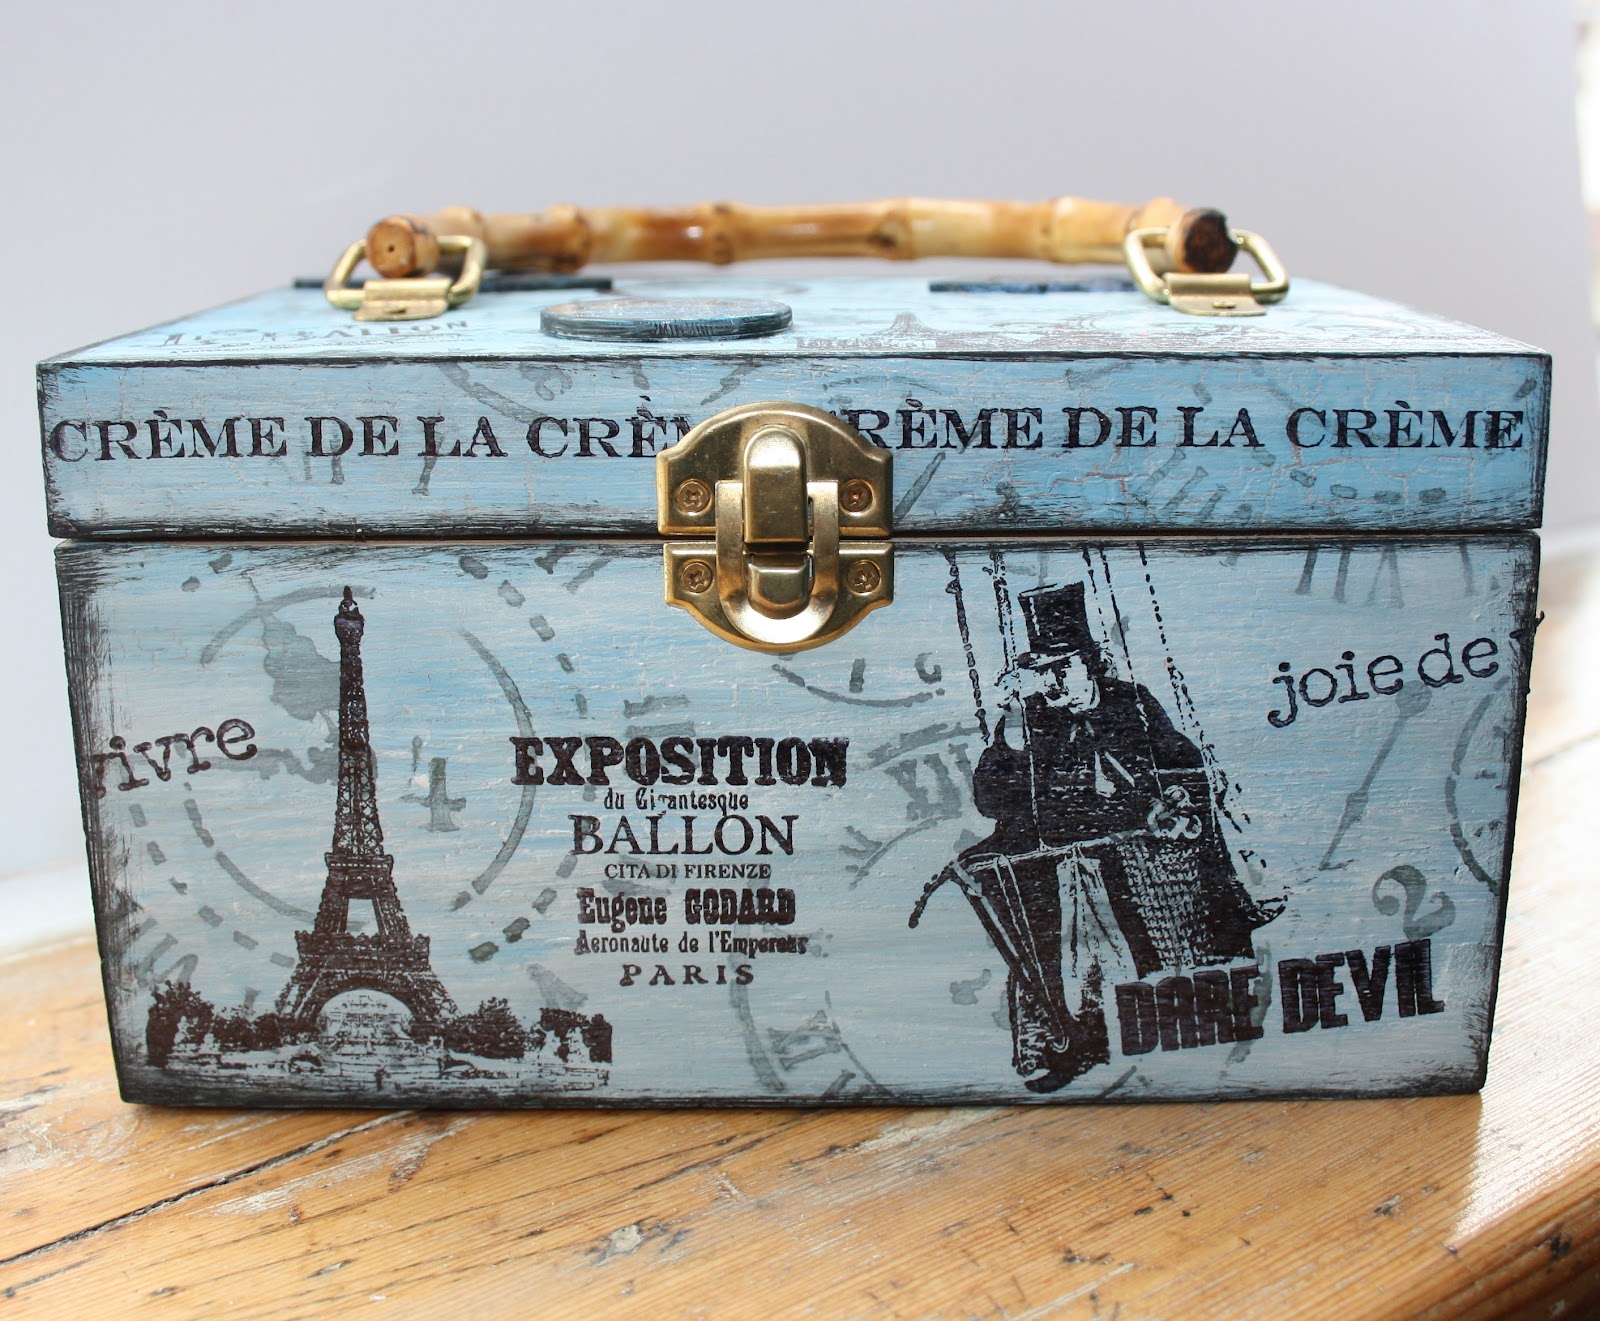
Paris Exposition Vanity Box For Happy Daze


This Box is for the happy Daze Design Team Blog
I have used the Artistic Outpost stamps Paris Exposition and French Flight to alter this Box. The Box is one of the Vanity Boxes available from the shop.
The background has been created by using a crackle paint background, I found the blue was too bright when this was done, so I applied a coat of Picket Fence distress stain which gave it a lovely aged look.
Viva Inka Gold in Hematite was applied through a crafters Workshop Stencil.
All the stamping was done using black archival ink.
Acrylic fragments and arrows were added to the lid.

The challenge this month is "March To Your Own Tune" use anything musical. For full details of the challenge have a look HERE

Thursday, 23 February 2012

Steampunk Time Travellers Book For Happy Daze


Pop the key in the keyhole give it a quick twist to turn the cogs that have been revealed by the aged and torn cover, the engine on the back will start and wizz your off to the destination you have written in the book.
Just be sure that your key number is the same as your book, or who know's where you could end up.

II have used the new Artistic Outpost stamps Industrial Backgrounds on this book available from Happy Daze.

For full details of how this was made check out the post on their blog.