Showing posts with label Unruly Paperarts. Show all posts

Monday, 2 September 2013

Chunky Steampunk ATC for Unruly Paperarts


For the current challenge on Unruly PaperArts.
What I love about chunky wooden ATC's is the fact that you just just shove loads of stuff on them.
For this one I simply painted it cream and then dragged some brown paint over it to distress it a little bit, I stamped my back gound directly onto the block using black archival ink.

I drilled a hole in the side to insert a key charm and then added various painted die cut chipboard cogs and wooden spools to look like they were interconnecting and would actually turn and wind the chain.

My main image was stamped onto card and coloured in using Inktense pencils and mounted into position with sticky pads.


I was trying to get the feel of my Icarus trying to reach the handle to turn off the crazy machine before it turns night into day and burns his wings

My main image is the the Icarus stamp by Lost Coast (he is one of my favourite stamps)
The background is a Blockheads Stamp.

Thank you for your visit today, Carol x

Monday, 1 July 2013

Postcards from the edge at Unruly Paperarts


Postcards are the theme this month over at the unruly Blog. To see all the details follow this LINK.
I have done my little 6 x 4 afty farty piece with a parisian theme using rub-ons, and inky messy stuff.

Thanks for your visit today, Carol x

Sunday, 23 June 2013

Shabby Chic Box for Unruly Paperarts


I have a tutorial on how I altered this box on the Unruly Paperarts Blog today. If you would like to pop over and have a look this is a link to the BLOG.

Thank you for visiting today, Carol x

Monday, 1 April 2013

Test your Metal At Unruly Paperarts


It's all about metal at Unruly Paperarts for April You can read all about it and see the full details for the challenges on the Blog.

My Dt piece for this month is just a wooden box that has been painted and then had lots of "stuff" added to it's top.

Thanks for visiting, Carol x

Saturday, 23 March 2013

ATC Bird House For Unruley Paperarts


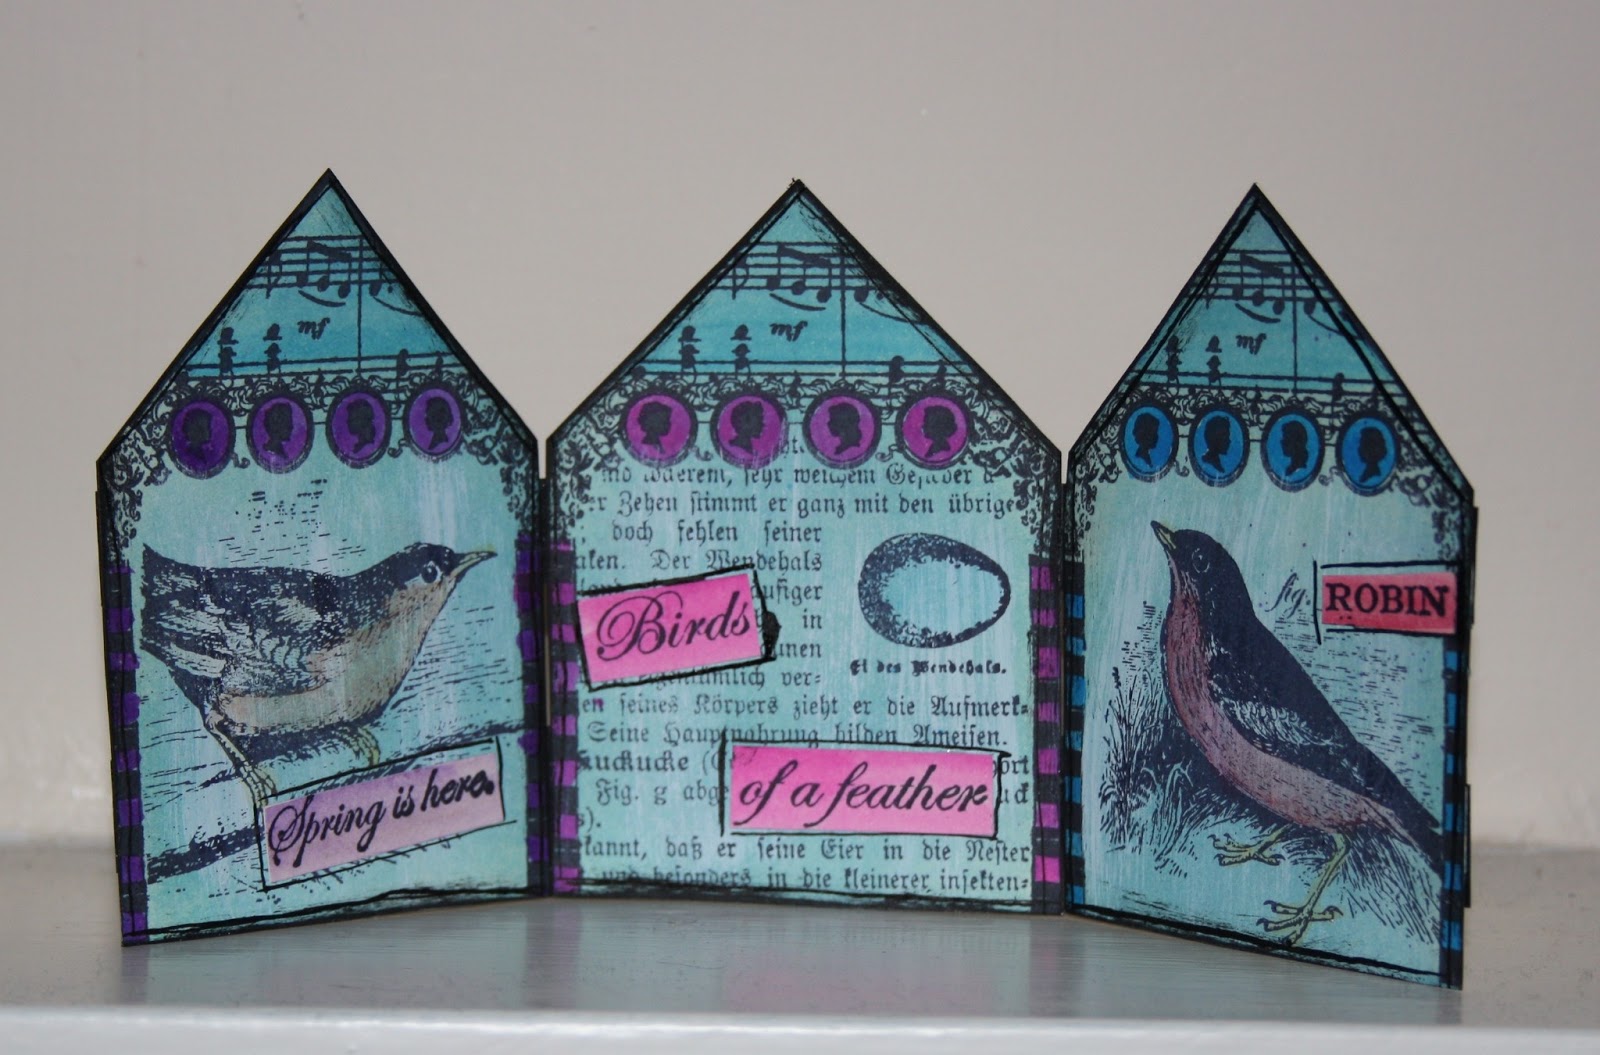
Today on the Unruly Paperarts Blog I have a tutorial for you showing how I made this little Tri-fold ATC. You can find all the details on the blog HERE.

The Rubber stamps I have used on my arch are Birds of a Feather and Whimsical Melange by The Artistic Outpost and they are available direct from The Artistic Outpost and in the UK you can buy them from Happy Daze.

I am entering this into the Artistic Outpost challenge for March.


Thanks for visiting today, Carol x

Sunday, 27 January 2013

Unruley paperarts parisian box


Its my turn on the Unruly paper arts blog today. To see the blog click the link Here

I have altered a box in keeping with the theme this month. This just a little wooden box that you can buy from lots of sites on line, it measure appoximatly 14 x 9 cam and is 5 cm high.
I gave it a coat of Sky fresco finish paint, I used this as it reacts well with the Picket fence distress stain which I gave it a coat of when the paint was dry.


I then sealed it with a coat of matt medium. I then stamped directly onto the box using an archival ink and masking the images as I went. When this was all dry I dragged a black acrylic dabber around the edges to give it a bit of definition.


Finishing it off with an old vintage button as a faux knob and a fleur-de-lys charm on the front.
This is a very quick little box to decorate and makes a great gift.
The stamps I have used are from Artistic Outpost, and are available from the site here

I have removed the link for unruley paperarts as it looks as it there is a temporary problem with the site and it is giving a virus warning.


Carol x

Friday, 4 January 2013

The Paris issue for Unruly Paperarts


There is a touch of the Parisian on the Unruly paperarts blog this month. To join in and upload your projects for the challenge have a look at the post on the BLOG for all the details.

Hopefully see you over there, Carol x

Sunday, 25 November 2012

Quick Cards and Tags for Unruly paperarts


I have share some quick makes today over on the Unruly Paperarts blog.

Do pop over to the BLOG to see the details of how I made these quick and easy cards.

The images I have used are by Crafty Individuals as they are nice block images and work well for this type of card, but there are lots of this type of image around at the moment which are not to fiddly to cut out.

Thank you for dropping by , Carol x

Monday, 5 November 2012

Unruly Paperarts :Reader Art Quest 1. Gift Tags


Novembers Art Quest this month for Unruly Paperarts is all about gifts and tags. I have made a fun pair of tags for the challenge and you can see the full details of the challenge this month on the Unruly Paperarts blog HERE.

I have used Stampotique Rubber Stamps on my tags. Stampotique Rubber is available from Stampotique originals and in the UK you can purchase them from Happy Daze.

Thank you for visiting, Carol x

Monday, 27 August 2012

Journal It For Unruly Paperarts


This month on the Unruly Paperarts Blog it's all about Journalling. I have incorporated the tags I made for the theme last month in my project. I have made the page loose and I will bind the book when all the pages are decorated ready for personal notes to be added.
I started by cutting a large piece of heavy weight drawing paper approx (35 x 28 cm). I then folded it up  and in half to form a double sided page with  pockets along the bottom edges.
I then unfolded. I inked and spritzed one side above the fold with Dylusions ink in shades of London Blue and Cut Grass, using a water sprtizer to blend them. I then flipped the paper over and did the same thing with the smaller area beneath the fold line. the using various stencils and inks I created the pattern effects on the pages.


I decorated the tags from last month in the same way. The tags are double sided to give extra journalling apace.


I then refolded the page to give the double sided page with the pocket at the bottom and machine stitched around the 3 edges as shown in the pictures.


The tags now fit into the pockets. I punched the page ready for binding with my zutter, as I am making a book as a gift, with a mixture of pocket pages and plain pages for them to use as a personal journal, that is why I have not added any stamps or personal notes to the pages. The tags make a great addition to the pockets as it gives extra room for adding pictures or little notes to.

Carol x

Sunday, 15 July 2012

Tag Your It, For Unruly Paperarts


This month on the Unruly Paperarts blog it's about water techniques, and I wanted to share some watery backgrounds with you and I thought the best way to show them off was with tags. I have shown each background, explaining exactly how it was done. They are all pretty basic but they all do give a lovey base to show off your stamped images.

They are quick, easy and fun to do, because as much as I do like to do big projects, sometimes I just want to sit down and faff with inks and paper and make nothing in particular, and these are perfect for those moments. So I usually end up with a pile of these made ready for when I need them. I tend to stamp onto them and send them in place of birthday cards, as basically my cards do leave a lot to be desired, and these larger size tags are perfect for this.

For these tags I have used the same two colour inks.


Spray the two colours of ink onto your craft mat, or other non stick surface. Lay your tag onto the inky surface, try to lay it down flat and not to twist it so the colours blend into each other rather than mix. Carefully remove trying to keep it straight as you lift it, dry with a heat gun. Lay a stencil over the top of the inked tag and spritz with the water, blot dry with some kitchen roll and then dry with a heat gun.


Spray your colours as before, but this time when you lay your tag onto the colours swish your tag around a bit so the colours blend a bit more. Lay your wet tag onto a clean section of your craft mat and using a pipet drop water onto your tag in several places, blot with kitchen roll, repeat until you are happy with the marbling effect that the water gives on the inky tag. Dry with a heat gun.


Lay your tag on your craft mat, place your stencil over the tag and spritz generously with water. Remove the stencil and spray with your two colours of ink. Mop with kitchen roll and then dry with your heat gun.

I shall be incorporating some tags similar to these into my project next month, but as to what I shall actually be using them for you will have to check back next month and see..


Carol x


Sunday, 1 July 2012

Mermaid House For Unruly Paperarts


It's all about the beach this month on the Unruly Paperarts Blog. There are two challenges to upload your artwork for, Beautiful Beach and Marvellous Mermaids. 
This is my example for the Marvellous Mermaids theme. I have a friend who makes these little beach huts out of driftwood from the beach, he gave me a couple of them as I quite often collect the wood for him when I am out walking. I have altered it using Verday paint's that are available exclusively in the UK from Happy Daze.

The seahorses and shells are made using Pardo clay with moulds, and the verday works really well on the baked clay.


For the texture I mixed sand with texture paste and when everything was stuck on and dry, I treated it with the verday paint. I filled the door recess with shells and other odd bits and pieces, and then filled the recess with Ice resin.


The mermaid image is by Stampotique.

Carol x

Sunday, 3 June 2012

Buds and blossoms Clock for Unruly Paperarts June Art Quest


The theme of the Reader Art Quest this month, is best Bouquet.
I have revamped an old clock. Using Viva through a stencil for the flourish's , then coating it all with Verday Paints and Patina solution.

The book plate is cut from an old biscuit tin and patina'd in the same way. The Dragonfly is a charm given the Verday Treatment. As you can probably tell Verday is my new fun crafting thing. It will soon be available to buy from Happy Daze ( it should actually be in stock in the next week or so) I cannot sing it's praises enough. I have used other solutions for this technique in the past, but this is in a better selection of base colours and gives an amazing finish to your items.

The flowers are hand made and I shall be doing a tutorial for these on the happy daze blog in the next week or so.
Carol x

Sunday, 27 May 2012

Wedding Memory Box For Unruly Paperarts


My First post for the Unruly Blog. The theme this month was wedding, so I have altered this larger sized box to be a wedding memento box to keep all those little bits and pieces in that you accumulate from your special day.
I personally have lots of bits and pieces including all the usual bits, one of the corks from the bottles of champagne, some of the decorations from the cake and some more random ones, some of the confetti thrown at me that one of my little bridesmaids collected and gave to me, and a small collection of six  hand drawn pictures that one of the guests did for me during the reception.
To see more pictures and a small tutorial of how it was done have a look on the Unruly Blog.

Carol x