Showing posts with label Verday Paint. Show all posts

Tuesday, 27 November 2012

Altered Tin with Verday Paints For Happy Daze


This was in it's previous life a M & S mint tin. I Painted it with the Verday Copper Patina paints and solution to give it the lovely patina finish.
I then gave it a coat of Multi medium to seal it before stamping onto it.
I used the Artistic Outpost stamps Paris Exposition and  French Flight, stamping the images directly onto the lid of the tin using Black Stazon ink and masking as necessary.

Thank you for visiting my blog, Carol x

Monday, 24 September 2012

The Zombie Queen's Halloween Tiara


This started life as a cheap plastic tiara, ( you can see it in the photo below)


The main element, the skull I made from Pardo clay and once baked it I sanded it and stuck it to the front of the tiara where I had removed the large pink plastic heart.


I wanted this to have the look of having been in the grave for years, only seeing daylight again when the dead zombiefied body of the prom queen clawed her way to the surface. So I gave it a couple of coats of the Iron paint as a base. When this was dry I sponged copper and bronze over the top, spraying and letting it dry, then adding more until I got the look I wanted.


To finish it off, once I was happy with the finish from the verday I added a tiny amount of Gold Rub and Buff to highlight some of the raised areas, and this worked really well with the verday finish and really made the cheap plastic look like metal.


To finish I added some Fusible fibres to look like cobwebs.

I used all the Verday paints on this and it does show how just by having a different pain as your base you can get a very different effect with the paints. The Iron base does give a very old and rusty look and even the copper and, brass and bronze over this can look very different compared to when they are used with the others as a base.

Verday paints are avaibable from Ten Seconds Studio and do please add their blog to your favourites as there are a great selection of videos available on there and if you get stuck at all I am sure you will find the help you need on one if them. Also don't forget their Facebook page, upload your artwork made with their products, as it is lovely to see what people make and I personally love a bit of inspiration when I get stuck on a project.

Thank you visiting and see you soon.

Carol x

Thursday, 20 September 2012

Domino Jewellery for Happy Daze


I wanted to try the Verday paint on some dominoes. I then sealed the images under a layer of resin. before I applied the Verday paint around their sides.


I aged some of the charms from the shop with the paint too, once the patina was dry I gave them a polish and this removed some of the patina gave them a lovely finish.
I added a small bale to the back for hanging.


Carol x

Monday, 17 September 2012

Steampunk Birdhouse


This was one of those projects that just happened as it went along, It started with no plan at all really. It began with an Ohh when I got the bird house out of its delivery box, I stuck on the cogs and then it sat there.....then my Verday arrived, so to me the logical step seemed to be to paint it. So it all went Copper....and then it sat there again, whilst I got on with other things and thought about it. I decided on a rusty roof, so I gave it a coat of the  Iron over the copper base and spritzed it. 


You can see the result in this photo

It was at this point I realised I should be taking photo's.


Basic items I started with: the Bird House, Die cut chipboard cogs and Ten Seconds Studio Metal. Other things will be added later but I don't know what yet.

I want some kind of stand for it so I am sitting here staring round my room hoping that something will appear, I think I need to go and investigate the garage and shed......be back soon. 


Well look what I found, I had forgotten all about this propeller. I picked up 2 of them at a reclamation yard I go to ( I actually go there so often that the lovely man who owns it now keeps me odd bits and pieces, and he had saved me these) I had put them in a box in the shed with lots of other bits, it was like Christmas. The bun knobs will be the feet, but the propeller will be used on it somewhere.

I have now decided to patina the sides so they go bluey / green, so I have applied the brass and copper paint over the copper base coat, and then spritzed it. It's now sitting and drying and waiting for the patina to appear. I use an old tray covered with paper when I spray with the patina as its then easy to move out of the way. I also added some of this patina colour to the roof, to pull the roof and the sides together a bit.


Painted and spritzed, waiting to dry, you can already see the colours starting to appear.


The next morning, you can see how the colours have appeared.

I painted the little bun feet in the same way as the house, but as the propeller was already metal and  rusty I decided I did not want to totally cover this up, just blend it into the colour scheme of the house a bit. So I gave it a quick swish around with the copper paint and then while this first coat was wet I spritzed it and I got the effect I wanted, it pooled in areas on the propeller and left some areas untouched. I wanted it to look like it had been left in the garden and just aged and I think I got this quite well, so I was very happy.


The propeller and feet once the verday is dry.

I stamped the clock image directly onto the Copper metal sheeting (I used Stazon) and then cut this out using a pair of scissor snips I have, I have found using my normal craft scissors on metal to much, can blunt them. Using a strong glue, I stuck this over the circular hole in the front of the house. I then layered up a few of the chipboard cogs, gave them the verday treatment. I added these to the clock front adding clock hands and an old rusty upholstery to the enter. I now glued on the feet and added the propeller.


I now now die cut some flowers and a butterfly Ten Seconds Studio Metal. 


I embossed the metal, using an embossing folder and my big shot.


I applied the patina solution directly to the metal using a sponge and left the patina colour to develop. When it is dry lightly sand the die cut shaped to remove the patina finish from the raised areas. 


Look how gorgeous this butterfly looks.

I now layered the die cuts up to make flowers, adding a bead to the centre with a piece of wire, and bending the petals to shape. I left the wire long enough to attach the flowers to the bird house with, and have enough spare to leave a small coiled length. I wound a piece of rusty wire around the bird house and attached the flowers and butterfly to this.


The Flowers finished and attached.

Thank you for taking the time to read this very long blog post and I do appreciate any comments that are left. Ten Seconds Studios metal and Verday Products are available from Ten seconds Studio.  They are on Facebook, and you can find their Blog HERE. In the UK you can purchase Ten Seconds Studio products from Happy Daze.

I also used the following products on my house.

Steampunk Birdhouse From Happy Daze
Tim Holtz Tattered Flower Garland die
Butterfly Die from Crafty Individuals


Carol x

Monday, 10 September 2012

Altered Art Jewellery with Ten Seconds Studio Verday Paint


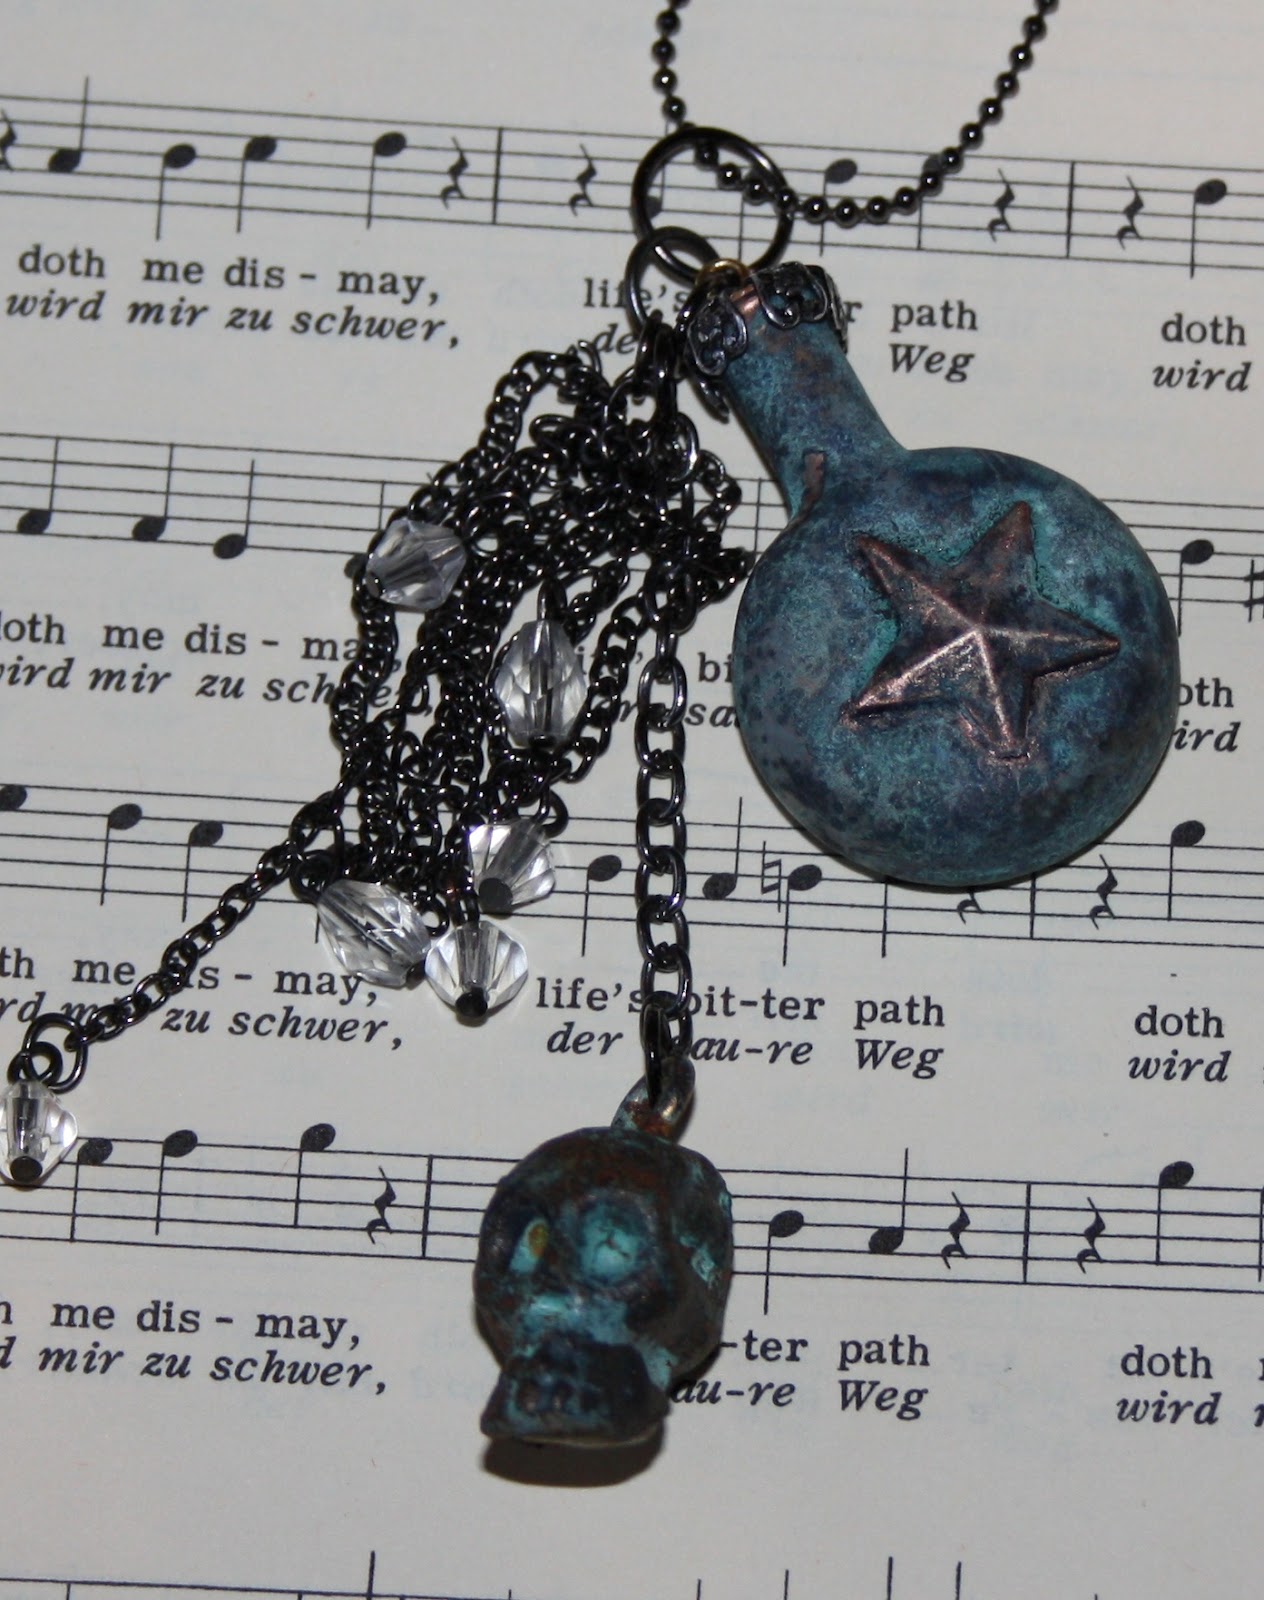
For my 2nd piece this month with Ten Seconds Studio Verday Paint I have made some jewellery. You can find Ten Seconds Studio on their website, their blog and their Facebook Page.


What I used

The only difference between the photo and my items used is the shape of the bottle, as I forgot to take this photo before I started and then I broke the other bottle of the same shape I had so I used a different one for the photo, but the bottle is just a basic little bottle like the Tim Holtz ones you can get or other makes that you can buy, just get one the shape you fancy and it will work just as well.


I am very happy with how the bottle turned out as I was not sure how the Verday would work on glass. I found in the end the best way was to coat the bottle with a base coat, I used the Viva Decor base coat in the end. I did experiment with PVA and multi medium but none worked as well.


Remove the cork and find something to fit into the hole so you have something to hold it with. ( I used a pippet as it's quite easy to shove in as far as you want to get a good fit.)  give the bottle a coat of the base and let it dry, it only takes a little while. Cut the hanger off the metal star and glue to the bottle. Now apply the Copper Verday paint to the bottle, I  found that 2 thin coats of the paint worked best, letting it dry between coats. (stick the end of the pippet into a jar and it sits up and drys) Once the 2nd coat is dry, allow at least a couple of hours for it to really set. Now use a sponge apply your choice of colours, I used the Brass. Now while it is still wet spray it with the Patina solution and leave to dry and for the patina to develop.


While this is working go to work on your skull. screw a small eyelet into the top of it and use this to hold it by. I used the Iron as a base on this as I wanted it to look old and as if it had just been dug up from a graveyard. As this was plastic it need the paint to be dabbed on and not brushed, and again this worked well in 2 thinner coats as you could give it 1 coat and then fill in any gaps with the 2nd. Let this dry well like you did for the bottle,. The using the sponge again and the Iron paint dab it onto the surface. Quickly before it starts to dry, add the bronze paint in some places, but not over the whole skull. Spray with the patina and leave for it to develop.


I wanted a very metallic look to the bottle and skull so when they were dry  I gently polished them with a soft cloth.

I added a jewellery finding to the cork to look like a metal bottle lid and then replaced the cork into the bottle add a bit of glue to hold it firmly. I then added jump rings and odd bits of chain to make a finished piece of jewellery.


Carol x 

Thursday, 6 September 2012

Ten Seconds Studio: Verday painted mirror


I was extremely honoured and excited to land a guest designer spot for Ten Seconds Studio earlier in the year, well my allocated month has come around, can it really be September already !!!

I received a lovely package from them stuffed full of Verday paints, which if you follow my blog you will know they are exactly my type of thing, messy and grungy, they should be my middle names really.

For my 1st spot this month I have made the mirror in the top photo and I will now run through how I did it and how I used the Verday paints to achieve the finished look.

The Flowers are hand made and I have done a small photo tutorial for these in a separate post so if you want to see all the details of how I made these have a look at the post by following this LINK. I really feel I should bite the bullet and get the hang of a video tutorial as I am getting asked for these now, but being a bit untechie I feel very nervous about trying one incase its pants.


I started off with the supplies as shown in the above photo, pretty basic yeah.


These are the paints from the Verday range I used to achieve the effects on the project.


Cut a piece of card to cover the mirror, then apply a texture medium to the wooden mirror surround. I used Viva Decor Ferro, the colour is irrelevant just use what one you have as it will be covered up. I applied this through a stencil using a pallet knife, clean your stencil and knife straight away as the ferro is water proof and once dry your things will be ruined. Let this dry thoroughly. Your mirror will now look like the one above.

Now the fun starts!! I used the Copper as the base, first give the bottle a really good shake, all the yumminess that makes the patina work sinks to the bottom of the bottle when it stands so it is important to do this. Then using a nice soft brush, a wide one is best, give whole mirror a coat of the copper paint, put to one side and let this dry.


Once dry I applied the Brass and Bronze to the copper base using a sponge, now whilst it is WET give it a good spritz with the Patina solution. This now needs to be left for the magic to happen, I left mine over night to let the colours fully develop. If when its dry you want the colours a bit different just reapply the brass or bronze and respritz. This is now your mirror base finished.


The flowers I made using the same colours and you can see exactly who I did these by following this LINK.


The swirls and the book plate have been cut from grunge board and Verdayed in exactly the same way as the mirror. The dragonfly is a mass produced charm that I treated with the copper Verday as the base and then applied the Brass over the top. I had to lightly sand the charm first to get the base coat of paint to stick to it properly, but after that it was just a case as carrying on as usual.

I attached everything to the mirror with a strong glue and used a couple of brads on the book plate to cover the holes. If you do feel inspired by my mirror I would love to see what you make and if it's a mirror remember to clean your glass before you photograph it, as I should have done, I just realised how smeary mine looks.

The Ten Seconds Studio site where you can buy all their goodies can be found HERE

Thank you for looking at my make and I have 3 more project to share with you through the month, my next one will be on Monday. I hope to see you back then and any comments are appreciated.

If anyone is interested in purchasing any of my makes, there is a link to my Folksy shop in my sidebar.

Edited to add. I have been asked by few people who makes the Dragonfly quote I have used on this. It is From the Jo Capper-Sandon range and is made by Stampotique. The full range of their stamps can be seen on their site HERE and in the UK you can purchase them from Happy Daze.

Carol x

Ten Seconds Studio: Verday Paint Flower Tutorial


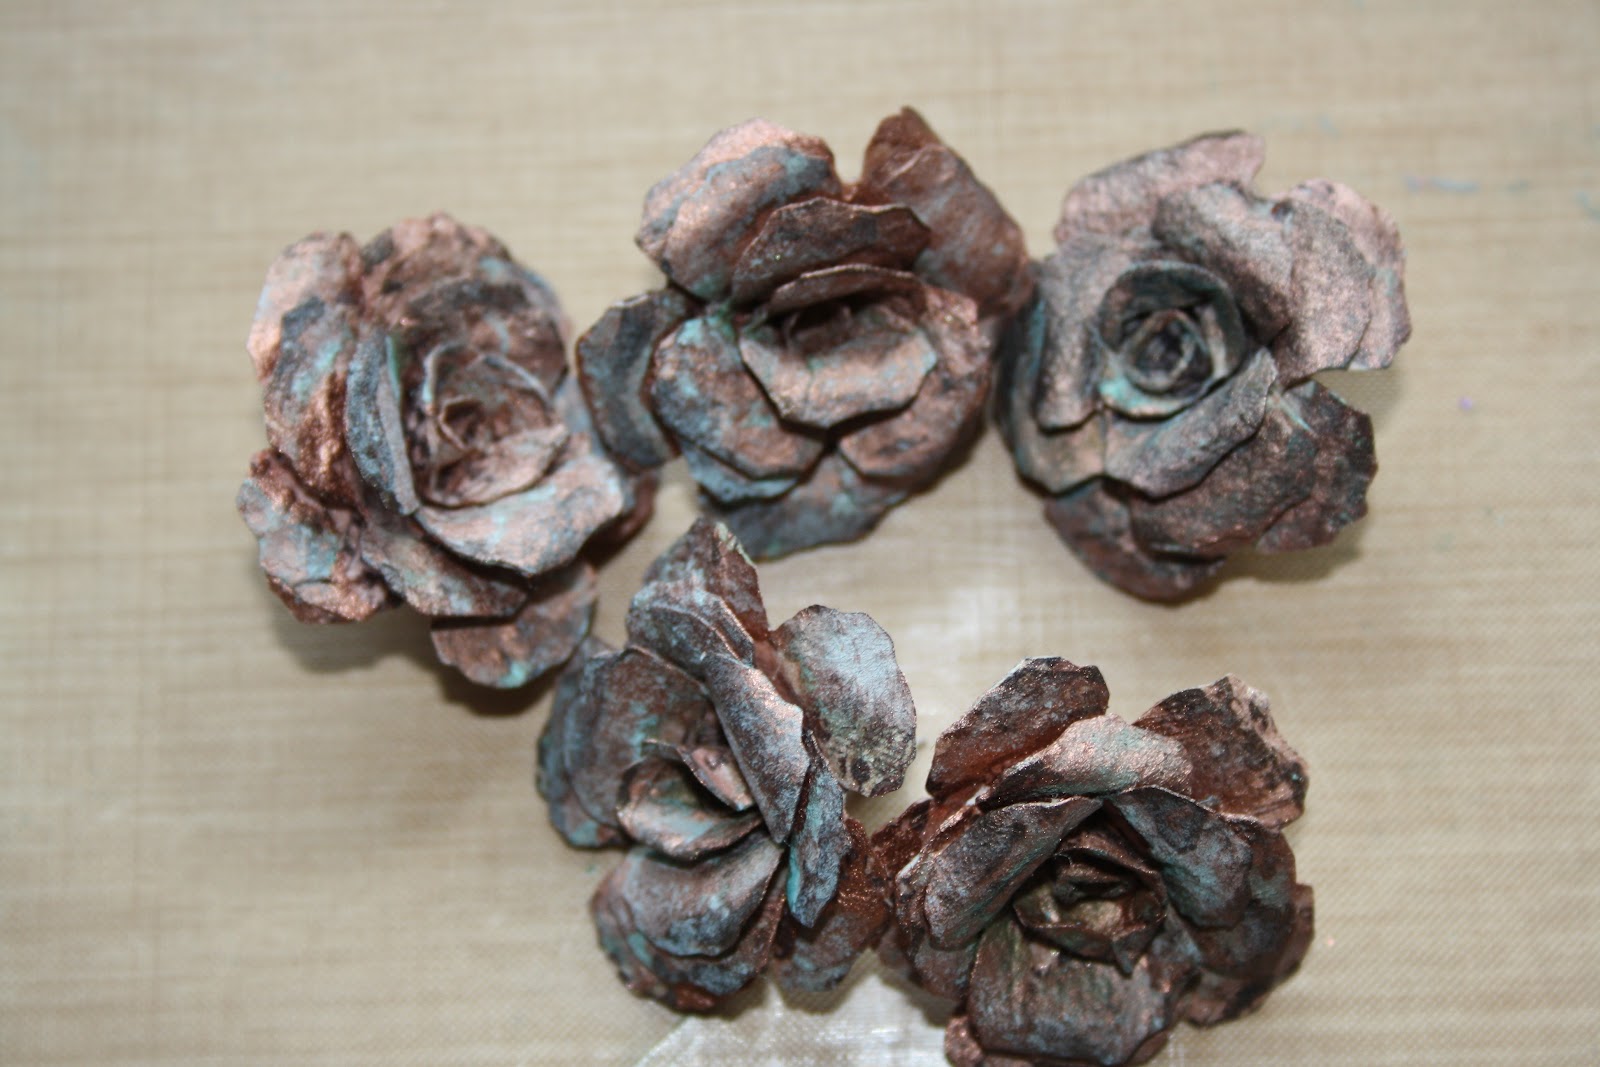
I do really enjoy making my own flowers and embellishments for projects, so I thought I would share with you how I have made flowers using Verday paint, and some mulberry paper ( yes I too have a mountain of this) The Verday paint works really well on mulberry paper as the paper is porous, so it soaks into it, which gives a lovely patina finish.

Step 1
I  cut my shapes using a flower die, but if you don't have a die cutter just cut them by hand. You need 3 shapes for each flower.

Step 2
Now cut them as shown in the picture.

Step 3
Glue them together using a glue like glossy accents or Mod Podge. Snip the bottoms of all of them except the smallest one. Now using something small and round, the end of a paint brush is good for this, curl the petals under. Your shapes will now look like this.


Step 4
Start with the small center one that has not had its bottom bit cut off, put some glossy accents onto the point and twist it, so it is quite stiff, now start to layer your flowers up. Put the point through the cut center of the next smallest, pushing it down well into the center. Add some more accents to the bottom rim of the flower and layer the next piece onto the bottom, placing it so the petals are spaced around the flower, carry on with the  remaining flower shapes until you flower ends up looking like this.

Step 5
It will dry quickly, and when it is give the petals a bit more of a roll back to define their shape. Paint the flower with the Copper verday paint. Give it two thin coats letting it touch dry between coats. Now put it to one side to dry throughly.


Step 6
Once Dry, place it on a craft mat and give it a spritz with the patina solution, a mini mister gives a nice light spray, which is all you need. Once they are thoroughly dry they will look like this and have a nice stiff feel to them. They even feel old as well as looking old.


Add anything else you want to them, distress stickles look lovely on these, or add random spots of glossy accents and  add Beadazzles, Glitter or Frantage Shaved ice would add a lovely morning dew appearance to them.


Carol x

Tuesday, 28 August 2012

Small Altered Cheese Box


For my Happy Daze piece today I have altered a smaller sized cheese box using Copper Viva ferro paint through a mask to give some texture to the box lid. It was then painted with Verday paints. The "fly" word is by Stampotique.

As this is round it fits perfectly in with the current challenge on Happy daze this month. For full details of the challenge have a look at the blog post HERE.


Carol x

Saturday, 18 August 2012

Altered Domino Necklaces


I have been playing with domino's again lately. I originally got them out again as I received a lovely set of printed domino Images from Crafty Individuals and I loved them so much that I had to use them straight away. I have made necklaces out of the dominoes.

I have covered the imaged with Ice-Resin to protect them and then finished off the edges of the Dominoes with Verday Paint. Everything in my house is getting Verday'd at the moment...umm oh look the cat is sitting still lol.

The images can be found here on the Crafty Individuals Site and the Resin and Verday paints are both available from Happy Daze who just happen to have a 10% off sale that ends on the 20th of August.

I have listed these for sale in my Folksy shop, they come supplied with a metal ball chain.

Carol x

Wednesday, 11 July 2012

Verday On Glass For Happy Daze


For Happy daze this week I have been playing with the verday paints and Memory Glass. This is a photo of the main piece I have made with them, there is a another example on the blog post. Do pop over to the blog and have a read of how I did it.  If you have time it would be great if you could leave a comment.

Carol x

Sunday, 1 July 2012

Mermaid House For Unruly Paperarts


It's all about the beach this month on the Unruly Paperarts Blog. There are two challenges to upload your artwork for, Beautiful Beach and Marvellous Mermaids. 
This is my example for the Marvellous Mermaids theme. I have a friend who makes these little beach huts out of driftwood from the beach, he gave me a couple of them as I quite often collect the wood for him when I am out walking. I have altered it using Verday paint's that are available exclusively in the UK from Happy Daze.

The seahorses and shells are made using Pardo clay with moulds, and the verday works really well on the baked clay.


For the texture I mixed sand with texture paste and when everything was stuck on and dry, I treated it with the verday paint. I filled the door recess with shells and other odd bits and pieces, and then filled the recess with Ice resin.


The mermaid image is by Stampotique.

Carol x